
How are you? Still with me?
This is post 5 of 7 of the Baked Series.
Contest is almost coming to a close!
I’m doing seven posts this week (8/8 – 8/14) from the book
by Matt Lewis and Renato Poliafito
Baking is my Zen will be having a
from August 8 through August 14, 2010.
The giveaway will be the ‘not yet released’ cookbook,
By Matt Lewis and Renato Poliafito
Their book is due for release in October 2010. When it is available, the winner of the giveaway will receive a copy from…yours truly…Me.
In addition, you’ll receive a Baking is my Zen T-Shirt.
You’re probably asking, what are the rules to win this book?
Here are THE RULES for all seven posts (8/8 - 8/14):
• Contest starts on Sunday, 8/8/10 at 12a.m. EST.
• Contest ends on Tuesday, 8/17/10 at 11.59p.m. , EST.
• Winner announced on Wednesday, 8/18/10 by 5pm, EST.
• Find the WORD OF THE DAY within each post. Type it in the comment box as follows: Example: word of the day: bake
• You can post your comment daily in each post or all at once.(due by 8/17)
• All seven posts must have a comment with the ‘word of the day’ indicated.
NOTE: THIS GIVEAWAY IS OPEN FOR U.S. ONLY.
To make it easy, I have the word of the day very visible for you. Remember, you need to type or copy and paste the word of the day (insert word) in the comment box.
This is EXACTLY how it is to appear in the comment box:
word of the day: tricolor
So, today’s word of the day: tricolor
Here are a couple bloggers who also made Baked Tricolor Cookies.
Check out their great blogs!

Baked Tricolor Cookies
From the cookbook Baked-New Frontiers in Baking by Matt Lewis and Renato Poliafito
Original Recipe below
Adapted Recipe Photo Tutorial by Carmen of Baking is my Zen

The Tricolor Cookie, or Rainbow Cookie, is a nearly ubiquitous part of the traditional American-Italian dessert platter, and it happens to be Renato’s favorite snack. Our version of the cookie incorporates our bakery’s colors (brown, white, and orange) instead of the red, white, and green used to evoke the Italian flag in the original cookie. We’ve also tweaked the amounts of marzipan and added some orange zest for a citrus zing. The layers are sandwiched together with an apricot-amaretto jam and topped off with a glossy dark chocolate glaze for a modern spin on an old-school classic.
Yield: 20 cookies
For the cookie layers
1 cup all-purpose flour
¼ teaspoon salt
7 ounces almond paste (recipe follows)
¾ cup sugar
½ teaspoon pure almond extract
¾ cup (1½ sticks) unsalted butter, softened
3 large eggs
Grated zest of 1 orange
Orange food coloring (liquid or gel)
2 tablespoons dark unsweetened cocoa powder, sifted
For the filling
2/3 cup apricot jam
2 tablespoons amaretto liqueur
For the glaze
6 ounces dark chocolate (60% cacao), coarsely chopped
1 teaspoon light corn syrup
½ cup (1 stick) unsalted butter, softened, cut into cubes
MAKE THE COOKIE LAYERS
1. Preheat the oven to 350° Fahrenheit.
2. Butter three 8-inch square baking pans.
3. Line the bottom of each pan with parchment paper and butter the parchment.
4. Dust with flour and knock out the excess flour.
5. Sift the flour and salt together in a small bowl and set aside.
6. In the bowl of an electric mixer fitted with the paddle attachment, beat the almond paste, sugar, and almond extract together until small crumbs form.
7. Add the butter and beat on high speed until the mixture is combined.
8. Scrape down the bowl and add the eggs, one at a time, beating until each is incorporated.
9. Add the orange zest and beat until combined.
10. Add the flour mixture in three parts, beating on low speed after each addition until combined.
11. Divide the batter among three small mixing bowls.
12. In the first bowl, add a few drops of orange food coloring to the batter, and mix well.
13. Continue to add a few drops of food coloring and mixing until the batter is medium orange in color.
14. In the second bowl, add the cocoa powder to the batter and whisk until fully incorporated.
15. Leave the third bowl plain.
16. Pour each batter into a prepared pan and smooth the tops.
17. Bake the layers for 12 to 15 minutes or until a toothpick inserted in the center of each layer comes out clean.
18. Transfer the pans to a wire rack and cool for 20 minutes.
19. Invert the cakes onto the rack, remove the pans, and let cool completely.
20. Remove the parchment.
MAKE THE FILLING
In a small saucepan over low heat, stir the jam and amaretto until warmed through and completely blended, 3 to 5 minutes.
ASSEMBLE THE TRICOLOR COOKIES
1. Place the chocolate layer on a serving rack and evenly spread half of the apricot jam over the top.
2. Top with the plain (or white) layer and spread with the remaining apricot filling.
3. Top with the orange layer and let the layers sit in the refrigerator for 5 minutes (or while you make the chocolate glaze).
MAKE THE GLAZE
1. In a large nonreactive metal bowl, combine the chocolate, corn syrup, and butter.
2. Set the bowl over a saucepan of simmering water and cook, stirring with a rubber spatula, until the mixture is completely smooth.
3. Remove the bowl from the pan and stir for 30 seconds to cool slightly.
4. Spread the glaze over the top of the bar cookies, completely covering the orange layer (some glaze may spill down the sides of the cake).
5. Place the tray in the refrigerator until the chocolate topping completely sets (about 1 hour).
6. Remove the tray from the refrigerator, wait 30 minutes for the chocolate to warm up, and cut into 20 individual squares or use a small cookie cutter to create your own shapes.
7. The bars can be stored in the refrigerator, tightly covered, for up to 4 days.
HOW TO MAKE ALMOND PASTE
1½ cups finely ground almonds
1 cup confectioners’ sugar, sifted
½ teaspoon pure almond extract
1. Put all the ingredients in a food processor with 2 tablespoons water and process until a paste forms.
2. Remove from the processor, wrap tightly in plastic, and refrigerate until ready to use.
3. Extra almond paste, tightly wrapped, keeps well in the freezer.
Baked Note: Customize your tri-color cookies by using different colors of food coloring. Remember that coloring the chocolate layer will prove unsuccessful.
Baked Tricolor Cookies – PHOTO TUTORIAL
Adapted Recipe by Carmen of Baking is my Zen

MAKE THE COOKIE LAYERS
Preheat the oven to 350° Fahrenheit.
Spray three 8-inch square baking pans with Baker’s Joy.
(I used Baker’s Joy-baking oil spray with flour)
Line the bottom of each pan with parchment paper and spray the parchment.

Sift the flour and salt together in a small bowl and set aside.

In the bowl of an electric mixer fitted with the paddle attachment, beat the almond paste (I used store bought), sugar, and almond extract together until small crumbs form.


Add the butter and beat on high speed until the mixture is combined.

Grate lemon zest. (used lemon instead of orange)

Scrape down the bowl and add the eggs, one at a time, beating until each is incorporated.


Add lemon zest.

Add the flour mixture in three parts, beating on low speed after each addition until combined.

Divide the batter among three small mixing bowls.
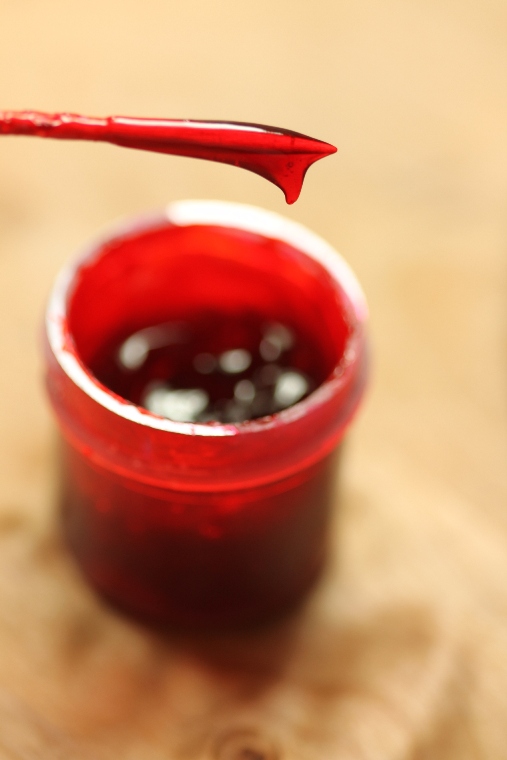
In the first bowl, add a few drops of pink food coloring to the batter, and mix well.


In the second bowl, add the cocoa powder to the batter and whisk until fully incorporated.


Leave the third bowl plain.
Pour each batter into a prepared pan and smooth the tops.


Bake the layers for 12 to 15 minutes or until a toothpick inserted in the center of each layer comes out clean.


Transfer the pans to a wire rack and cool for 20 minutes.
Invert the cakes onto the rack, remove the pans, and let cool completely.

Remove the parchment.
MAKE THE FILLING
In a small saucepan over low heat, stir the jam and amaretto until warmed through and completely blended, 3 to 5 minutes.
(My suggestion: Make sure the pulp is blended well. Do this by hand or small food blender. I wish I had.)


ASSEMBLE THE TRICOLOR COOKIES
Place the chocolate layer on a serving rack and evenly spread half of the apricot jam over the top.

Top with the plain (or white) layer and spread with the remaining apricot filling.

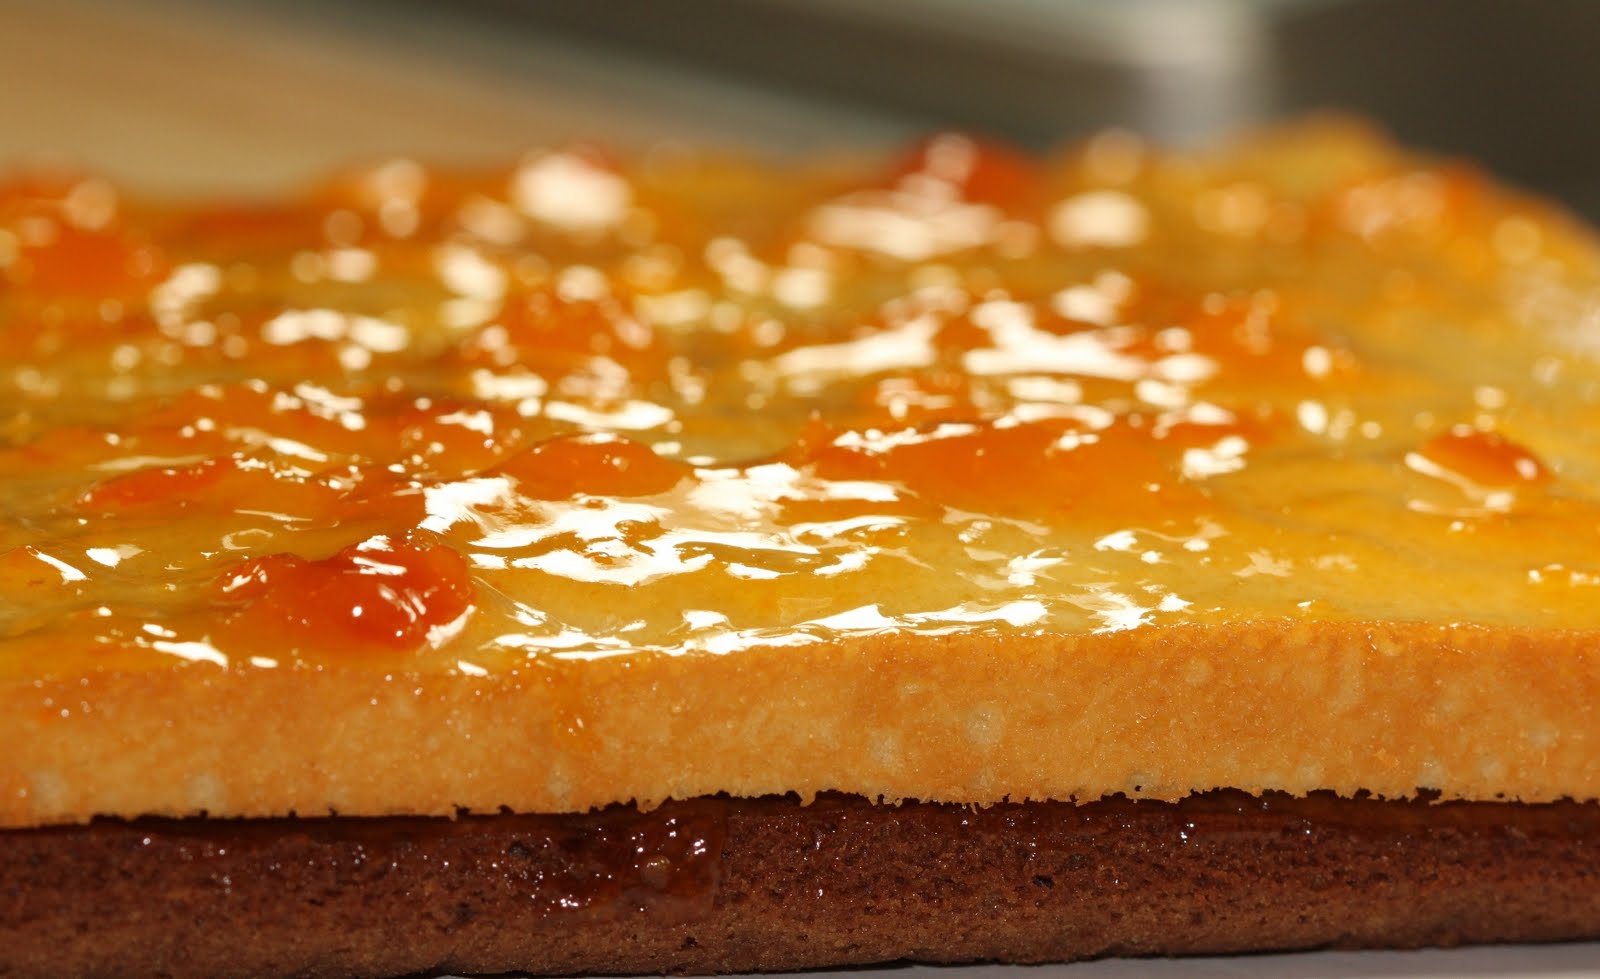
Top with the pink layer and let the layers sit in the refrigerator for 5 minutes (or while you make the chocolate glaze).

MAKE THE GLAZE
In a large nonreactive metal bowl, combine the chocolate, corn syrup, and butter.


Set the bowl over a saucepan of simmering water and cook, stirring with a rubber spatula, until the mixture is completely smooth.


Remove the bowl from the pan and stir for 30 seconds to cool slightly.
Spread the glaze over the top of the bar cookies, completely covering the pink layer.
(some glaze may spill down the sides of the cake)


Place the tray in the refrigerator until the chocolate topping completely sets (about 1 hour).


Remove the tray from the refrigerator, wait 30 minutes for the chocolate to warm up, and cut into 20 individual squares or use a small cookie cutter to create your own shapes.
(I used large cookie cutters. The lack of height of small cookie cutters will not work here)
The bars can be stored in the refrigerator, tightly covered, for up to 4 days.
Baked Note: Customize your tri-color cookies by using different colors of food coloring. Remember that coloring the chocolate layer will prove unsuccessful.

NOTE: To be eligible for the Cookbook Giveaway, all 7 posts must have comments as indicated in the rules.

I HEART these cookies!!
Peace in Baking,
Carmen

Baking is my Zen…sweet nibbles for the soul


